
Check-in & Check-out
The core of the app. Here's everything about the Check-in screen.
Two modes
Your HR team configures whether the big Check In button writes attendance directly (Checkin Based, the default) or first asks you to pick a task (Timer Based). The rest of this page describes the default. For the task-picker variant, see "Timer Based" flow below.
Open the screen
From the home screen, tap the big "Check In" (or "Check Out" if you're already IN) button in the top card.
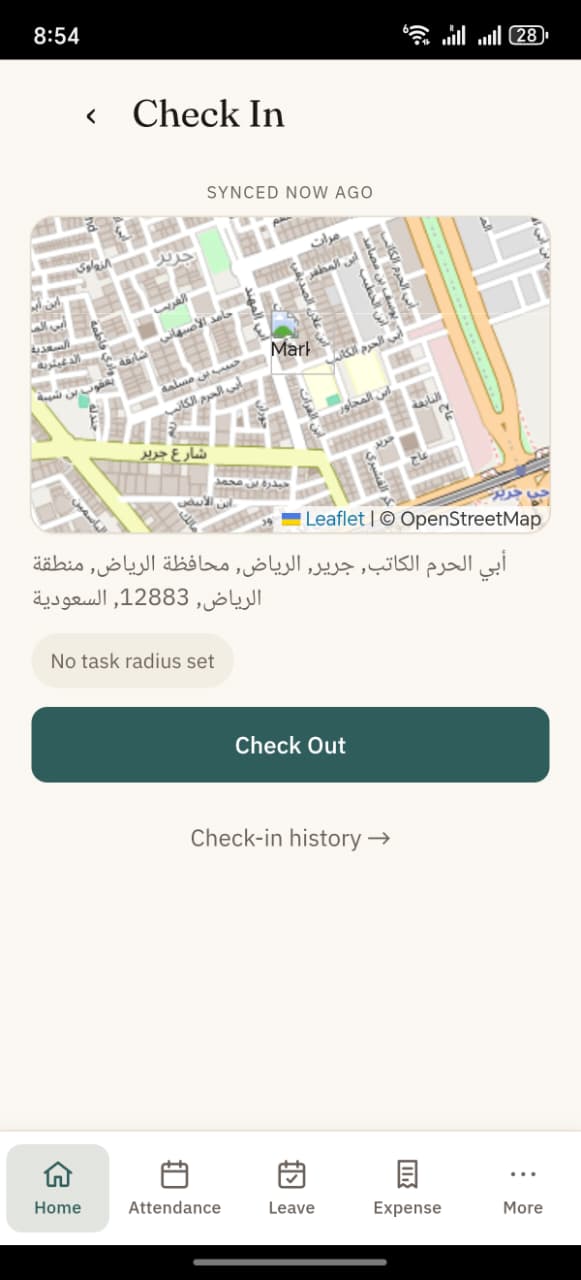
What the screen shows
| Element | What it is |
|---|---|
| Map preview | A small OpenStreetMap view centered on your current GPS location |
| Address | Reverse-geocoded street address of your location (when online) |
| Geofence chip | Whether you're inside / outside your task radius (if a task is assigned) |
| Selfie slot | Shown only if your company requires selfies |
| Big button | "Check In" or "Check Out" depending on your current state |
| Check-in history → | Link to see all your past check-ins |
First-time permission prompts
The first time you use Check-in, Android asks for:
- Location — required. The app needs your GPS coordinates to record where you checked in. Tap Allow.
- Camera — only if your company uses selfie mode. Tap Allow the first time you take a selfie.
If you accidentally tap Deny, go to Android Settings → Apps → Fateh HR Demo → Permissions and grant them there.
Doing a check-in
- Let the map settle — it takes 1–3 seconds to get your GPS coordinates.
- If selfie is required, tap the Selfie slot and take a photo.
- Tap Check In.
- You feel a soft haptic buzz → message says "Recorded." (online) or "Queued — will sync when online." (offline).
- The app automatically sends you back to the home screen after a moment.
The Check Out flow
Identical — just tap "Check Out". The button label and the entry's IN/OUT tag change based on your last action. So the app always knows what "the next action" should be.
"Getting GPS location…" — what's happening
If you see this message, your phone is still resolving your position. Common causes:
- You're indoors or underground — GPS signal is weak or blocked
- Just turned on location services — first fix takes 10–30 s
- Airplane mode / battery saver has disabled GPS
The app gives it ~8 seconds. If no coords arrive, you see "Can't get GPS. Grant location permission, then tap Check In again." — check the permission and retry.
The geofence chip
If your HR team has configured a task with a location and radius, the app checks whether you're inside that radius.
| Chip | Meaning |
|---|---|
| 🟢 Within task radius | You're at the right place. Check-in will be accepted as "inside". |
| 🟠 Outside task radius — will be flagged | You're away from the assigned location. The check-in still records but your manager will see it was off-site. |
| ⚪ Location unavailable | GPS isn't ready yet. Wait a moment. |
| ⚪ No task radius set | Your task doesn't have a geofence. No location rule applies. |
TIP
The geofence rule is set by your HR / manager per task. Being "Outside" doesn't block you from checking in — it's just flagged for review.
Viewing your check-in history
Tap Check-in history → at the bottom of the Check-in screen. You'll see:
- Every check-in you've done, most recent first
- An up arrow (↓) on a green badge for IN
- A down arrow (↑) on a grey badge for OUT
- The location address or task name
- The exact time (hours + minutes + seconds)
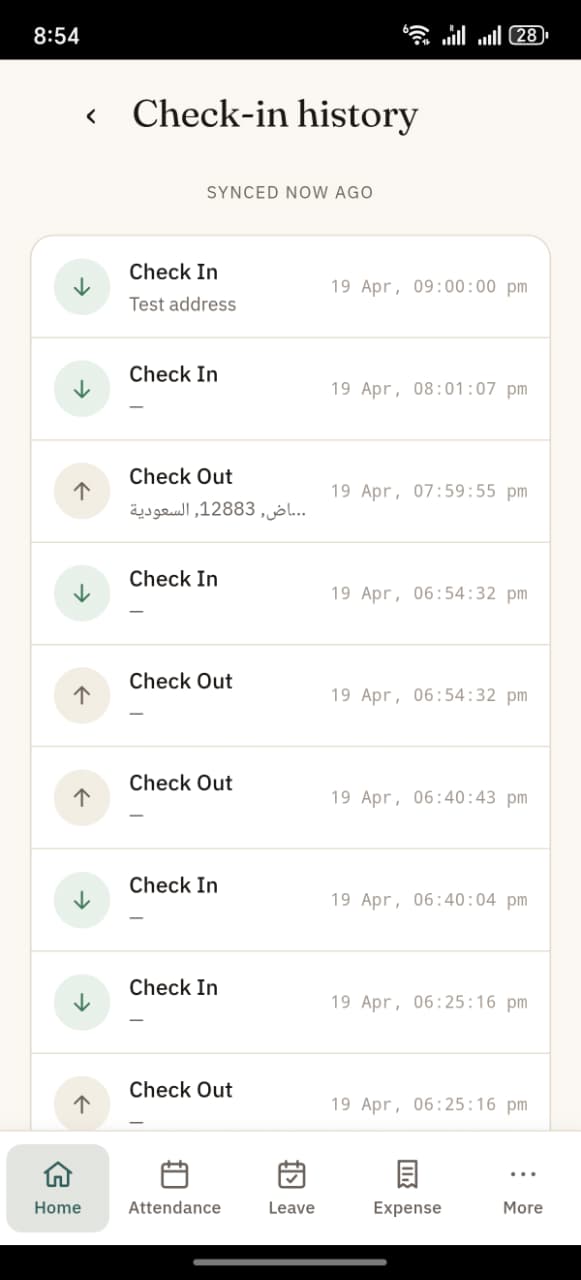
On the home screen, the last 3 check-ins are also shown in the "Check-in history" card for quick reference.
If something goes wrong
| Message | What to do |
|---|---|
| "Please take a selfie to continue." | Your company requires one. Tap the selfie slot first. |
| "Can't get GPS." | See permission / GPS section above. |
| "Queued — will sync when online." | Normal for offline mode. It will sync automatically when network returns. |
| App stuck on "Finding your location…" | Wait up to 10 s, then tap Check In again. Or restart the app. |
"Timer Based" flow
If your HR admin has set Attendance Mode to Timer Based, the Check-In button works a little differently:
- You tap Check In on the home screen.
- The Check-in screen asks you to pick a task from your assigned list before you can proceed.
- You select a task, the app captures GPS, and taps Check In.
- Server creates an Employee Checkin (IN) plus a running Timesheet row tied to that task.
- On the Tasks tab, that same task now shows a running timer — same timer, viewed two ways.
Checking out in Timer mode
- Tap Check Out from home.
- The app shows the running task name and the elapsed time on the Check-in screen.
- Tap Check Out → the running timer stops, the Timesheet row closes with hours, and an Employee Checkin (OUT) is written.
Switching task mid-day
Stop on one task (Check Out) then Check In again with a different task. You'll get two attendance pairs for the day — one per task.
No tasks assigned?
You'll see "No tasks assigned." Message your HR team — in this mode they need to assign at least one open task before you can check in.
See Attendance mode for the full logic.
Next
- How offline mode works — essential reading for field staff
- Attendance calendar
- Attendance mode — why your check-in screen looks like it does